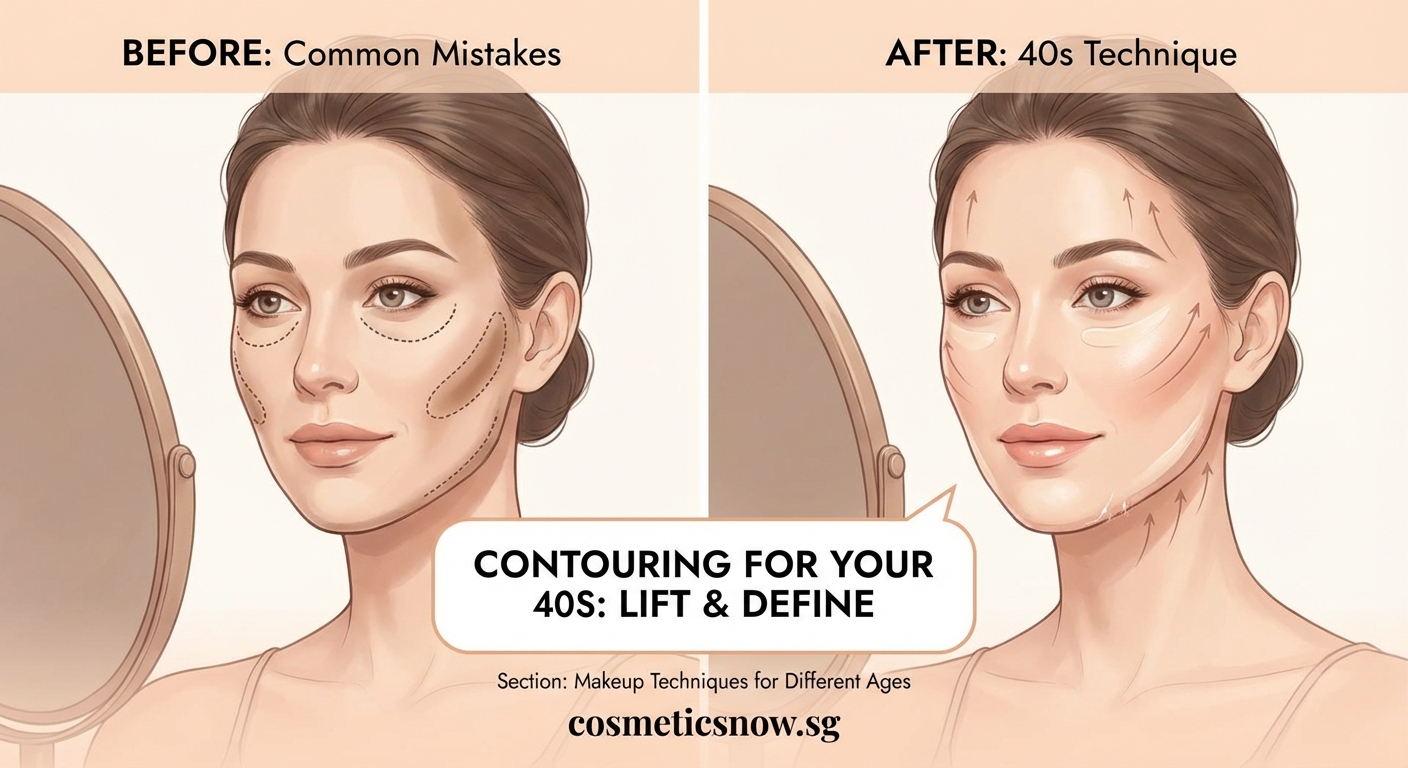
Contouring shouldn’t make you look older, but traditional techniques often do exactly that on mature skin. Heavy application settles into fine lines, harsh edges create an unnatural appearance, and shimmer highlights every texture you’d rather minimize. The good news? Modern contouring methods work beautifully with your skin’s natural changes, creating dimension and lift without looking overdone.
Successful contouring over 40 requires cream formulas, strategic placement that lifts rather than sculpts, and a light hand. Skip powder products that settle into lines, avoid harsh cheekbone contouring that emphasizes sagging, and focus on areas that truly benefit from definition like the jawline and temples. The goal is a refreshed, naturally dimensional appearance that works with your skin’s texture, not against it.
Why Traditional Contouring Methods Fail on Mature Skin
The Instagram-style contouring that works for younger faces creates problems after 40.
Powder formulas cling to dry patches and settle into expression lines. That gorgeous cheekbone definition you’re trying to create? It actually draws attention to areas where skin has lost elasticity. Heavy application looks mask-like under natural lighting, exactly the opposite of what you want.
Your skin has different needs now. It’s likely drier, with more visible texture and areas of uneven tone. Traditional contouring techniques were designed for smooth, taut skin. They don’t account for the reality of mature skin texture.
The solution isn’t to avoid contouring altogether. It’s to adapt the technique for your current skin.
Choosing the Right Products for Skin Over 40

Product selection makes or breaks your contouring results.
Cream and liquid formulas are non-negotiable. They blend seamlessly into skin without emphasizing texture. Look for products with a slight sheen, not matte finishes that can look flat and aging.
Your contour shade should be only one to two shades deeper than your natural skin tone. Anything darker looks muddy and obvious. The goal is subtle shadow, not dramatic definition.
For highlight, skip anything with visible shimmer particles. These catch light in every fine line and wrinkle. Instead, choose a luminous, satin-finish product that creates a soft glow.
“The biggest mistake I see women over 40 make is using products that are too cool-toned or too dark. Your contour should mimic a natural shadow, which means it needs warmth. Think of the color of your skin after a week at the beach, not a harsh gray-brown.”
Consider these product characteristics:
- Buildable coverage that allows gradual intensity
- Creamy texture that moves easily across skin
- Long-wearing formula that won’t require touch-ups
- Hydrating ingredients like hyaluronic acid or squalane
- Warm undertones rather than cool or ashy shades
Step-by-Step Application for Natural Results
The application process matters as much as product choice.
-
Start with properly prepped skin. How to apply foundation like a professional makeup artist creates the perfect base for contouring. Your foundation should be fully blended before you begin.
-
Apply contour to your temples first. Use a small amount of product and blend upward and outward toward your hairline. This creates lift and definition where it matters most.
-
Lightly contour along your jawline from ear to chin. This defines without looking heavy. Blend downward onto your neck slightly to avoid a harsh line.
-
Add a touch of contour to the sides of your nose if desired, but keep it minimal. Heavy nose contouring looks obvious in person.
-
Apply highlighter to the high points of your cheekbones, blending back toward your temples. Place a small amount on your brow bone and down the bridge of your nose.
-
Blend everything thoroughly using a damp beauty sponge. This removes any harsh edges and melds the products into your skin naturally.
Blending takes longer than application. Spend at least twice as much time blending as you do applying product. The goal is for contour and highlight to look like they’re coming from within your skin, not sitting on top of it.
Where to Place (and Avoid) Contour After 40

Strategic placement makes the difference between lifted and aged.
| Area | Apply Contour | Skip Contour | Why |
|---|---|---|---|
| Temples | Yes | Creates lift, defines face shape | |
| Jawline | Yes, lightly | Defines without emphasizing jowls | |
| Cheekbones | Yes | Can emphasize sagging in mid-face | |
| Under cheekbones | Yes | Draws attention to lost volume | |
| Nose sides | Minimal only | Too much looks obvious and aging | |
| Forehead | Yes, at hairline | Balances proportions naturally |
The traditional “hollowing out” under cheekbones that works beautifully at 25 can emphasize volume loss at 45. Instead, focus on areas that genuinely benefit from definition.
Your temples are a prime spot for subtle contouring. As we age, this area often becomes more prominent. A touch of contour here creates the illusion of a more oval face shape.
The jawline benefits from gentle definition, but avoid heavy application. You want to suggest a clean line, not draw one. If you have jowling, keep contour very light and blend it carefully to avoid making the area look heavier.
Common Mistakes That Add Years Instead of Dimension
These errors instantly age your appearance.
Using powder contour is the most common mistake. It settles into every line and looks dusty by midday. Cream formulas stay put and look natural all day.
Contouring too low on your face emphasizes drooping. Keep contour above the level where your cheek naturally falls. Contouring 101: where to apply each product based on your face shape provides detailed placement guidance for different facial structures.
Applying highlight to your entire cheekbone creates an overly shiny appearance that emphasizes texture. Limit highlight to the highest point only, and blend it carefully.
Forgetting to blend onto your neck creates a mask effect. Your face shouldn’t be a different color or tone than your neck. Always blend contour slightly below your jawline.
Using cool-toned contour makes your skin look gray and dull. Warm tones create natural-looking shadows that enhance rather than muddy your complexion.
Adjusting Techniques for Different Skin Concerns
Your specific skin needs require customized approaches.
For dry skin: Mix a drop of facial oil into your contour product before applying. This prevents the product from clinging to dry patches. How to properly layer your serums for maximum skin benefits helps ensure your skin is properly hydrated before makeup application.
For oily skin: Set your cream contour with a light dusting of translucent powder only in areas that get shiny. Avoid powder on areas with visible texture.
For combination skin: Use cream products everywhere but set your T-zone lightly if needed. This prevents shine without creating texture issues.
For sensitive skin: Choose fragrance-free, hypoallergenic formulas. Test products on your jawline before using them all over your face.
For hyperpigmentation: Be extra careful with contour placement. You don’t want to darken areas that are already darker than the rest of your face. Focus on temples and jawline only.
Tools That Make Application Easier
The right tools simplify the process and improve results.
A small, dense synthetic brush works best for initial contour application. It provides control and picks up the right amount of product.
A damp beauty sponge is essential for blending. The moisture helps cream products meld into your skin seamlessly. Replace sponges every few weeks to maintain hygiene.
Your fingers work beautifully for warming up product and pressing it into skin. Don’t underestimate this simple tool. Body heat helps cream formulas blend naturally.
A fluffy brush is useful for softening edges after you’ve blended with a sponge. It creates an airbrushed finish without disturbing your application.
Good lighting is technically a tool. Apply makeup in natural light whenever possible. It shows you exactly how your contour will look in real-world situations.
Building Your Contouring Routine Into Daily Makeup
Contouring doesn’t need to add significant time to your routine.
- Apply contour immediately after foundation, before powder or blush
- Start with less product than you think you need
- Build intensity gradually if more definition is desired
- Check your work in different lighting throughout application
- Set with a light mist of setting spray for longevity
The 5-minute morning beauty routine that actually works shows how to streamline your entire makeup application without sacrificing results.
For everyday wear, focus on just two areas: temples and jawline. This takes under two minutes once you’re practiced. Save more detailed contouring for special occasions when you have extra time.
Adapting Your Technique as Your Skin Changes
Your contouring approach should evolve with your skin.
What worked at 42 might not work at 52. As skin continues to mature, you may need to adjust product formulas, placement, or intensity.
Pay attention to how your contour looks throughout the day. If it settles into lines by afternoon, your formula is too dry. If it disappears completely, you need a longer-wearing product.
Seasonal changes affect your technique too. Winter dryness requires more hydrating formulas. Summer heat calls for lighter application that won’t slide off.
Why your makeup routine should change every decade explains how to recognize when your techniques need updating.
Your face shape changes over time as well. Areas that once benefited from contour might need highlight instead. Stay flexible and adjust your approach as needed.
Troubleshooting When Results Look Wrong
Even with careful application, issues can arise.
Problem: Contour looks muddy or dirty.
Solution: Your shade is too dark or too cool-toned. Switch to a warmer shade that’s closer to your natural skin tone. Blend more thoroughly to soften the color.
Problem: Contour disappears within an hour.
Solution: Your skin is too oily for the formula you’re using. Try a longer-wearing product or set with a tiny amount of powder in contoured areas only.
Problem: Fine lines look more visible after contouring.
Solution: You’re using too much product or a formula that’s too dry. Switch to a more emollient cream and apply less. Stop making these 10 common makeup mistakes that age you covers other aging mistakes to avoid.
Problem: Contour looks obvious rather than natural.
Solution: Spend more time blending. Use a damp sponge and work the product into your skin until you can’t see where it starts and stops.
Problem: Skin looks textured or cakey after contouring.
Solution: Your base isn’t smooth enough. Exfoliate regularly and ensure your skincare routine properly hydrates your skin before makeup application.
Creating Lift Without Looking Overdone
The goal of contouring over 40 is subtle enhancement.
Think of contour as a way to restore dimension that’s been lost over time, not to create dramatic new features. Your face has natural beauty that deserves enhancement, not transformation.
Focus on areas that create an optical lift. Temples, when properly contoured, draw the eye upward. A defined jawline creates the appearance of firmness. These subtle changes refresh your appearance without looking like you’re wearing obvious makeup.
Avoid the temptation to use contouring to “fix” features you’ve never liked. At this stage, the goal is to look like the best version of yourself, not to reshape your face dramatically.
Natural lighting is your best friend. If your contour looks great in your bathroom but obvious in daylight, you’ve gone too heavy. Always do a final check near a window before leaving the house.
Making Contouring Work for Your Lifestyle
Your contouring routine should fit your real life.
For work or casual outings, minimal contouring looks polished without appearing overdone. Just temples and a touch along the jawline creates subtle definition that photographs well in video calls.
For evening events or special occasions, you can add more dimension with additional placement and slightly deeper shades. The lower lighting of evening venues allows for more dramatic application.
If you wear glasses, be mindful of how frames interact with your contour. Heavy temple contouring can look odd when partially hidden by frames. Adjust placement accordingly.
For active lifestyles, choose long-wearing, sweat-resistant formulas. Cream products generally hold up better to moisture than powders, which can streak when wet.
Refreshing Your Look Throughout the Day
Contouring should last, but sometimes touch-ups help.
Carry a small cream product in your bag for midday refreshing if needed. A tiny amount on temples and jawline takes seconds to blend and revives your definition.
Blotting papers remove excess oil without disturbing your contour. Press gently rather than rubbing to maintain your application.
A light mist of setting spray can refresh your entire face and help contour meld back into your skin if it’s started to separate.
Avoid adding powder for touch-ups. This builds up product and emphasizes texture. If you need to mattify, use blotting papers instead.
Your Path to Natural, Age-Appropriate Contouring
Mastering contouring over 40 takes practice, but the results are worth the effort. You’re not trying to look 25 again. You’re enhancing the beautiful face you have right now, with all its character and life experience.
Start with just one or two areas and perfect your technique there before expanding. Use a light hand and remember that you can always add more product, but removing excess is harder. Take photos in natural light to see how your contour truly looks. Most importantly, embrace the goal of looking refreshed and dimensional rather than dramatically sculpted. Your face has earned every year, and the right contouring technique simply helps it look its absolute best.