There’s something magical about sinking into a warm bath after a long day. The water wraps around you, the tension in your shoulders starts to fade, and for a few minutes, the world slows down. Now imagine adding the gentle scent of lavender to that moment. Making your own custom blend is easier than you think, and it saves you money compared to store bought jars. With just a few pantry staples and a little bit of time, you can create a spa experience right in your own bathroom.
Creating DIY lavender bath salts at home gives you full control over ingredients, costs less than retail versions, and takes only 10 minutes of hands-on work. The basic recipe needs Epsom salt, sea salt, baking soda, dried lavender buds, and lavender essential oil. You can personalize the scent strength and add complementary oils like chamomile or rosemary. Store in an airtight jar and use about a half cup per bath for a calming soak that eases muscle tension and soothes your mind.
Why Make Your Own Lavender Bath Salts?
Store bought bath salts often contain synthetic fragrances, artificial colors, and preservatives you don’t need. When you make them yourself, you choose every ingredient. You also avoid the markup that comes with fancy packaging. A single batch can last you weeks, and the process is so simple it feels like a fun weekend project.
Plus, lavender is one of the most studied natural remedies for relaxation. Its aroma has been shown to lower cortisol levels and promote better sleep. Combining that with the magnesium in Epsom salt creates a powerful stress relief tool that costs pennies per use.
Ingredients You Will Need
Before you start, gather these items. Most are available at your local grocery store or online.
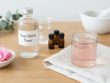
- Epsom salt (2 cups) – the base that soothes sore muscles
- Sea salt (1 cup) – adds trace minerals and helps with skin softness
- Baking soda (1/2 cup) – softens the water and can help calm irritated skin
- Dried lavender buds (3 tablespoons) – gives that natural floral look and gentle aroma
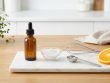
- Lavender essential oil (20 to 30 drops) – the star scent; adjust based on your preference
- A glass mixing bowl – metal or plastic can react with essential oils
- Airtight glass jar – for storage away from heat and light
“Always use pure lavender essential oil, not a fragrance oil. The therapeutic benefits come from the plant itself, not synthetic copies.” – Rachel Weaver, certified aromatherapist
Step by Step Recipe for DIY Lavender Bath Salts
Follow this numbered process to get a consistent, fragrant result every time.
- Combine the dry salts. In your glass bowl, mix the Epsom salt, sea salt, and baking soda. Stir with a wooden spoon until everything looks evenly distributed.
- Add the lavender buds. Toss in the dried buds and stir again. They will settle at the bottom of your jar later, so don’t worry if they aren’t perfectly mixed.
- Incorporate the essential oil. Drop the lavender oil into the salt mixture one drop at a time while stirring. This prevents clumping. Go slow and smell as you go. You can always add more, but you cannot remove it.
- Let the scent marry. Transfer your mixture to the glass jar, seal it, and leave it in a cool dark place for 24 hours. This allows the oil to absorb evenly into the salts.
- Give it a final shake. Before using, turn the jar upside down a few times to redistribute any settled oil or buds.
That is it. You now have a full jar of homemade lavender bath salts ready to use.
Ways to Customize Your Blend
The basic recipe works beautifully, but you can tailor it to your mood or skin needs.
- For deeper relaxation: Add 10 drops of chamomile essential oil along with the lavender.
- For an energizing morning soak: Use 15 drops of lavender and 15 drops of sweet orange oil. The citrus cuts through the floral and lifts your spirits.
- For dry or sensitive skin: Replace half the sea salt with colloidal oatmeal. Grind rolled oats in a blender until they become a fine powder.
- For a festive gift: Layer the salts in a clear jar with pink Himalayan salt and dried rose petals. Tie a ribbon around the neck and attach a small label with instructions.
Common Mistakes and How to Avoid Them
Even a simple recipe can go wrong if you overlook a few details. This table covers the most frequent errors.
| Mistake | Why It Happens | How to Fix It |
|---|---|---|
| Salts turn into a hard clump | Too much essential oil or moisture in the air | Reduce oil to 15 drops next time; store with a silica packet |
| Scent fades quickly | Oil was poor quality or not given enough time to bind | Use high purity lavender oil and wait 24 hours before use |
| Skin feels irritated after bath | Synthetic fragrance or too much oil | Double check your essential oil label for purity; stick to 20 drops |
| Lavender buds float to the top after mixing | Buds are lighter than salt | That is normal – just stir before scooping into the bath |
| Mixture looks dull or gray | Baking soda is not fully blended | Sift the baking soda before adding it to the salts |
Storing Your Homemade Lavender Bath Salts
Keep your salts fresh by following these simple rules.
- Use a glass jar with a tight lid. Plastic can absorb the essential oil over time.
- Store away from direct sunlight and heat. A bathroom cabinet works well.
- Label the jar with the date and oil amounts. This helps you replicate or adjust the recipe later.
- Use within six months. The essential oil will slowly lose potency, but the salts themselves remain safe for longer.
Adding Bath Salts to Your Wellness Routine
Your homemade lavender bath salts are ready. Now you just need the right moment. Run a warm bath (not too hot, or you will dry out your skin). Add about half a cup of salts under the running water so they dissolve fully. Soak for 15 to 20 minutes. Light a candle, put on soft music, and let your mind drift.
For best results, do this in the evening. The magnesium from the Epsom salt helps your body relax, and the lavender signals your brain to wind down. After the bath, pat your skin dry and apply a light moisturizer. Your skin will feel soft, and your muscles will thank you.
Pair Your Bath Ritual with the Right Skincare
A warm bath opens your pores and makes your skin more receptive to moisture. After you step out, your body is primed for a simple skincare routine. Consider applying a gentle serum or a nourishing face mask to lock in hydration. If you regularly wear makeup, make sure you remove your makeup properly before you get in the tub. This prevents dirt and product residue from being absorbed into your skin while you soak.
You can also use that post bath calm as the perfect time to follow a simple nighttime skincare routine (though the principles apply to evening, too). The key is to treat yourself with the same care you give your skin.
A Little Gift for Yourself and Others
One of the best parts of making your own bath salts is how shareable they are. Fill small mason jars with your blend, tie on a handwritten tag, and you have a thoughtful present for a friend who needs relaxation. Host a DIY bath salt party with a few friends. Everyone brings their own jar and leaves with a custom blend.
This recipe is also forgiving. If you run out of sea salt, you can use all Epsom salt. If you prefer a stronger floral scent, double the dried buds. The process is not rigid, which makes it perfect for beginners.
Final Soak: Making Lavender Bath Salts Part of Your Self Care
Creating your own calming lavender bath salts is a small act that rewards you again and again. You control the ingredients, you save money, and you get to enjoy a personalized scent that no store bought jar can match. Next time you feel the weight of the week pressing down, take ten minutes to mix a fresh batch. Let the warm water and lavender do their work. Your mind and body will be glad you did.