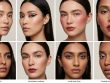
The glow you used to get from a powder highlighter just doesn’t cut it anymore. In 2026, the beauty world has shifted toward something more dimensional. It’s called chroma layering, and it’s the holographic makeup trend that’s quietly retiring your favorite highlighting palette. Instead of one flat stripe of shimmer, this technique builds light from within the skin using multiple translucent layers. Think of it like painting with stained glass. Each layer bends light differently, and when you stack them, the result is a prismatic glow that shifts as you move.
Chroma layering uses sheer, color-shifting pigments applied in thin coats to create a holographic glow that replaces traditional highlighter. It relies on skin prep, strategic placement, and three to five layers of complementary tones. This 2026 guide walks you through product selection, application order, and common mistakes so you can master the trend at home.
What Makes Chroma Layering Different From Highlighter
Traditional highlighter sits on top of the skin. It relies on mica particles and binders to create a reflective sheen. Chroma layering does the opposite. It uses lightweight, almost watery formulas that fuse with your foundation or tinted moisturizer. The light bounces from within the layers, not from a surface coating.
The chroma layering makeup trend borrows from color theory and prismatic optics. You are not adding a single color. You are adding a sequence of hues that interact with each other. A lavender base topped with a sheer gold gives a cool-warm shift. A pink base under a mint top layer creates a duochrome effect that looks different in sunlight versus indoor lighting.
For anyone who has tried the glass skin trend or the sunset blush technique, this is the next logical step. It is more subtle than a glitter bomb but more complex than a standard glow.
The Skin Prep That Makes Chroma Layering Work
You cannot build prismatic layers on dry or textured skin. The translucent pigments need a smooth, hydrated canvas to sit evenly. If your skin is flaky or your pores are visible, the layers will catch unevenly and look muddy.
Start with a gentle exfoliation. Use a lactic acid toner or a soft enzyme mask the night before. In the morning, apply a lightweight hydrating serum. Look for ingredients like glycerin, hyaluronic acid, or beta-glucan. Follow with a gel-based moisturizer that absorbs completely. Avoid heavy creams that leave a greasy film because they will repel the water-based chroma products.
If you want to learn more about building a solid skincare foundation, check out our guide on how to properly layer your serums for maximum skin benefits. Good skin prep is non-negotiable here.
Prime with a blurring primer that has a slight luminosity. Avoid matte primers. You want the base to have a natural sheen, not a flat surface.
How to Choose Your Chroma Products
Not every shimmer product works for chroma layering. You need products that are sheer, buildable, and free of large glitter particles. Look for these characteristics:
- Liquid or gel textures. Powders sit on top and disrupt the layered effect.
- High color transparency. The product should look like a tinted gloss, not a solid pigment.
- A fine, almost invisible shimmer. The particles should be micronized so they blend into the skin.
- Complementary color families. You want hues that sit near each other on the color wheel or opposite hues for a duochrome shift.
Here are the most common color combinations for 2026:
- Lavender and champagne gold for a cool-to-warm shift.
- Peach and pearl white for a natural, everyday prismatic effect.
- Mint green and soft pink for a playful, iridescent glow.
- Lilac and silver for a futuristic, editorial look.
- Rose gold and coral for a warm, sunkissed holographic finish.
You do not need five products. Start with two or three. A base layer, a mid layer, and a top accent layer.
The Step-by-Step Application Process
Follow this numbered sequence to get the chroma layering effect without streaks or patchiness.
-
Apply your foundation or skin tint as usual. Use a very thin layer. Heavy foundation will block the transparency of the chroma products. If you need more coverage, focus it on the center of the face and blend outward.
-
Take your first chroma layer. This is your base tone. Use a lavender or peach shade. Apply a tiny drop to the back of your hand. Dip a damp beauty sponge into the product and press it onto the high points of your face: the tops of your cheekbones, the bridge of your nose, your cupid’s bow, and the inner corners of your eyes. Do not swipe. Press and bounce.
-
Wait 90 seconds for the first layer to set. It should feel dry to the touch, not tacky.
-
Apply your second layer. This is your mid tone. Use a champagne gold or pearl shade. Use the same pressing motion with a clean area of the sponge. Focus on a slightly smaller area than the first layer. You want the edges to blend into each other naturally.
-
Wait another 60 seconds. If you apply too quickly, the layers will mix and turn into a single muddy color.
-
Apply your third layer. This is your accent. Use a silver, mint, or coral shade depending on your chosen palette. Press it only on the highest point of the cheekbone and the center of the eyelid.
-
Finish with a setting mist that has a dewy finish. Avoid matte setting sprays. They will dull the prismatic effect.
For a more detailed look at foundation application that supports this technique, read our guide on how to apply foundation like a professional makeup artist. The right base makes all the difference.
Common Mistakes and How to Fix Them
Even experienced makeup artists can mess up chroma layering on the first try. Here is a table that breaks down the most frequent errors and the simple fixes.
| Mistake | Why It Happens | The Fix |
|---|---|---|
| Muddy, grayish glow | Layers applied too wet or colors are too similar | Let each layer dry fully. Use more contrast in your color picks. |
| Streaky patches | Swiping instead of pressing | Always press with a sponge. Swiping drags the product. |
| Glitter fallout | Using powder formulas instead of liquids | Switch to liquid or gel chroma products only. |
| Uneven intensity | Applying different amounts on each side | Use the same number of drops for both sides of the face. |
| Disappearing glow | Setting with a matte powder or spray | Use a dewy setting mist. Avoid powder over the chroma areas. |
| Cakey texture | Too many layers without drying time | Stick to three layers maximum. Wait for each to set. |
How Chroma Layering Works With Other Makeup Trends
This technique does not exist in a vacuum. It pairs beautifully with other 2026 trends. If you are already trying the sunset blush technique, you can add chroma layers on top of the blush gradient. The key is to keep the blush sheer. A heavy pigment will block the light-bending effect.
Chroma layering also works with glass skin. In fact, it enhances it. Glass skin focuses on hydration and reflection. Chroma layering adds color shift. Together, they create a finish that looks like liquid metal caught in sunlight.
For those who love the no-makeup makeup look, use a nude chroma palette. A sheer champagne base with a pearl top layer gives a barely-there glow that looks like your skin is naturally luminous.
“Chroma layering is the first trend in years that actually rewards patience. If you rush it, you lose the effect. But if you take your time, the result is undeniably next-level.” — Jamie Lin, editorial makeup artist based in Los Angeles.
The Best Tools for Chroma Layering
Your fingers can work, but they are not ideal. Fingers leave uneven pressure and can disturb the layer underneath. Use these tools instead:
- A damp, fine-pore beauty sponge. The denser the sponge, the more control you have.
- A flat synthetic brush for precise placement on the cupid’s bow and inner eye.
- A clean fingertip for blending the edges of the layers if you want a softer look.
Avoid fluffy brushes. They absorb too much product and deposit it unevenly.
If you are new to building a complete beauty routine that supports this kind of advanced technique, start with our guide on the complete step-by-step guide to building your first skincare routine. A strong routine is the foundation for any trend.
A Quick Reference for Product Textures
Not all textures are created equal for this trend. Here is a simple breakdown of what to look for on the label.
- Liquid illuminators: Perfect for base and mid layers. They have the highest transparency.
- Gel cream highlighters: Good for mid and accent layers. They have slightly more grip.
- Water-based tints: Ideal for base layers. They disappear into the skin and leave only a color shift.
- Balm highlighters: Use sparingly for the accent layer. They are thicker and can disturb lower layers if you press too hard.
Avoid anything labeled “strobing cream” from previous years. Those products are often too opaque and contain larger glitter particles that do not layer well.
When to Skip Chroma Layering
This technique works best on skin that is well rested and hydrated. If you are dealing with active breakouts, sunburn, or severe dryness, wait until your skin calms down. The translucent layers will not hide texture. They will emphasize it.
Also skip chroma layering if you are in a rush. Each layer needs drying time. If you have five minutes to do your makeup, stick to a single swipe of a traditional highlighter. Save chroma layering for days when you have at least 15 minutes to dedicate to the glow.
The Future of the Holographic Glow
By mid 2026, major beauty brands are expected to release dedicated chroma layering kits. These will include three to four liquid shades designed to be stacked in a specific order. For now, you can mix and match from existing liquid highlighters and color-shifting primers. The key is to keep everything sheer.
If you want to stay ahead of the curve, start practicing with two layers this week. Add a third once you feel confident with the pressing motion. The chroma layering makeup trend is not going anywhere. It is the new standard for anyone who wants a glow that looks alive rather than painted on.
Embrace the Prismatic Future of Your Glow
Your old highlighter taught you where to put the light. Chroma layering teaches you how to make that light move. It is a small shift in technique that completely changes the way your makeup photographs, catches the eye, and holds up under different lighting conditions. Start with two shades, practice the pressing motion, and give each layer time to set. Within a few tries, you will wonder why you ever settled for a single stripe of shimmer.