Contouring can feel like a secret language when you’re first starting out. You see makeup artists creating incredible dimension with just a few strategic strokes, and you wonder if you’ll ever get it right. The truth is, contouring isn’t about following one universal map. Your face shape determines where shadows and highlights should go to enhance your natural features rather than fight against them.
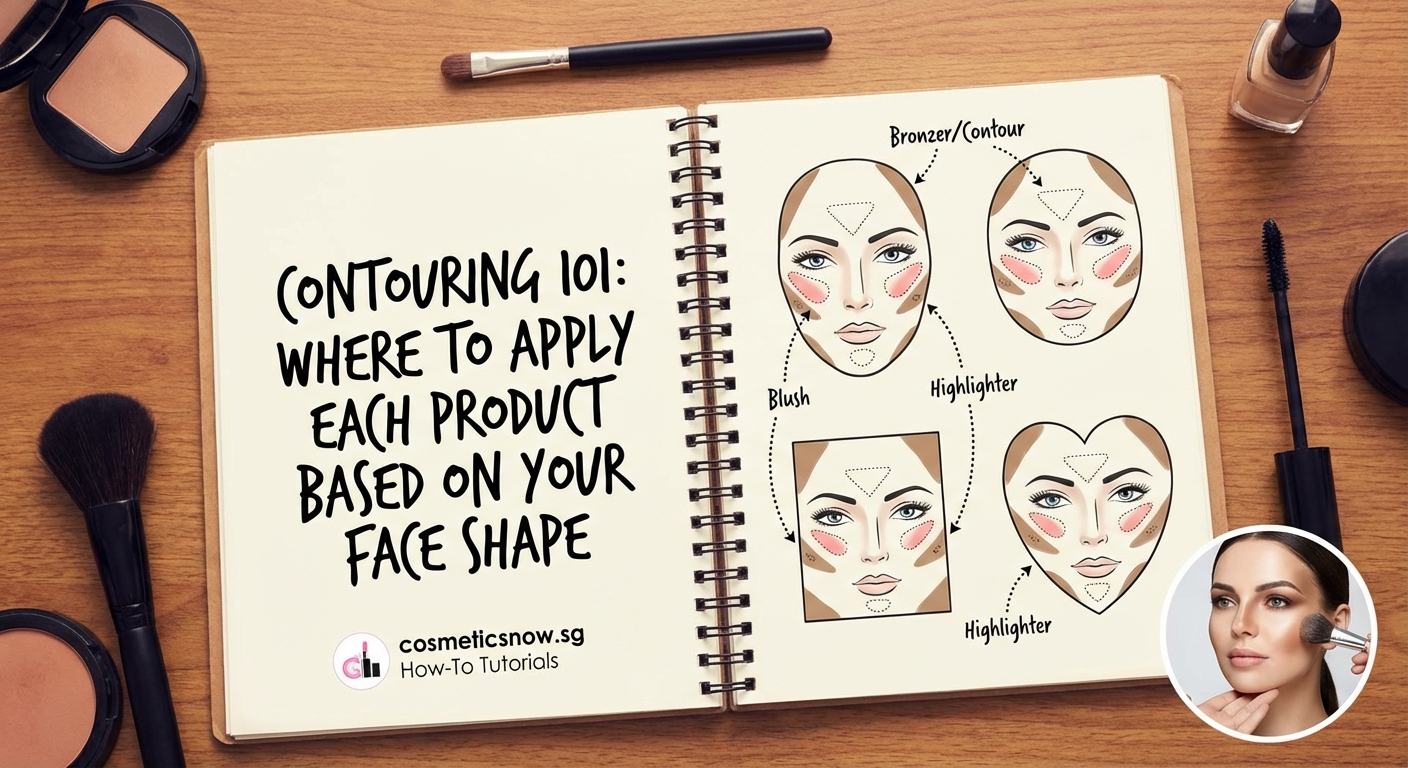
Successful contouring depends on identifying your face shape first, then applying contour and highlight to specific zones that create balance. Round faces need angular definition along the jawline, square faces benefit from softened corners, oval faces require minimal contouring, heart-shaped faces need forehead reduction, and long faces need horizontal dimension. The key is working with your natural bone structure, not against it.
Understanding Your Face Shape Before You Start
Before you pick up any products, you need to identify your face shape. This isn’t about fitting into a perfect category. Most people have features from multiple shapes.
Stand in front of a mirror with your hair pulled back. Look at the widest part of your face. Notice your jawline shape. Check if your forehead and cheekbones are similar in width.
Round faces have soft curves with similar length and width. Square faces feature a strong jawline with forehead and jaw roughly the same width. Oval faces are longer than they are wide with gently rounded edges. Heart-shaped faces are wider at the forehead and narrow at the chin. Long or rectangular faces have significant length compared to width.
Take a photo straight on in natural light. Trace the outline of your face on your phone screen or print it out. This visual reference helps you see your shape more objectively than a mirror alone.
Essential Products and Tools You Actually Need
You don’t need twenty products to start contouring. A cream or powder contour two shades darker than your skin tone works perfectly. Choose cool-toned shades for natural shadows. Warm browns can look muddy or orange.
For highlight, pick a shade one to two tones lighter than your skin. Cream products blend more easily for beginners. Powder works better on oily skin but requires more blending skill.
Your tools matter as much as your products. A dense, angled brush gives precise contour placement. A fluffy blending brush softens harsh lines. Beauty sponges work beautifully for cream formulas. Clean tools prevent patchy application and bacteria buildup.
Setting powder keeps everything in place. Translucent powder works for all skin tones. Apply it lightly after blending to lock in your work without adding extra color.
Start with how to apply foundation like a professional makeup artist before contouring. Foundation creates an even base that makes contour placement more visible and blending smoother.
Contouring for Round Faces
Round faces benefit from creating angles where curves naturally exist. Your goal is adding definition without looking harsh.
- Apply contour along your hairline from temple to temple in a curved line
- Sweep contour from the top of your ear down along your jawline, stopping before your chin
- Apply a small amount under your cheekbones, starting from your ear and blending toward the middle of your cheek
- Blend everything thoroughly so no lines remain visible
Place highlight on the center of your forehead, down the bridge of your nose, on your cheekbones above the contour, and on your chin. This draws attention to the center of your face while the contour creates the illusion of structure along the perimeter.
Avoid contouring your cheeks too far forward. This makes your face look hollow rather than sculpted. Stop your contour at the middle of your eye when you look straight ahead.
The biggest mistake with round faces is over-contouring the cheeks. Less is more. Build gradually rather than applying too much product at once.
Contouring for Square Faces
Square faces have beautiful bone structure that just needs slight softening at the corners. You’re working to create curves rather than sharp angles.
- Apply contour to the corners of your forehead near your hairline
- Blend contour along the outer edges of your jawline, focusing on the angles
- Lightly contour the sides of your nose if desired
- Skip heavy cheek contouring as your natural bone structure already provides definition
Highlight the center of your forehead in a rounded shape rather than straight across. Add highlight to the tops of your cheekbones, blending upward and outward. Place a small amount on your chin, blending in a circular motion.
This technique softens the strong angles while maintaining your natural structure. You’re not trying to hide your jaw. You’re creating balance between the angular and curved areas of your face.
Many people with square faces make the mistake of contouring their entire jawline heavily. This actually emphasizes the squareness rather than softening it. Focus only on the corners.
Contouring for Oval Faces
Oval faces are naturally balanced, so contouring should enhance rather than reshape. You have the most flexibility with placement.
Your main focus is adding dimension without changing your face shape. Light contouring under the cheekbones creates definition. A touch along the hairline adds depth.
- Apply minimal contour under your cheekbones, starting at your ear
- Blend a thin line along your hairline if your forehead feels too prominent
- Add subtle contour along your jawline only if you want more definition
- Keep everything soft and natural
Highlight your cheekbones, the bridge of your nose, your cupid’s bow, and the center of your chin. This creates a lifted, glowing effect without dramatic changes to your face shape.
The key with oval faces is restraint. You don’t need heavy contouring. Focus on enhancing your natural features rather than creating new ones. Many makeup techniques you see in tutorials are designed for oval faces, so you can experiment more freely.
“Contouring should look like natural shadows, not stripes of brown. If you can see where your contour starts and stops, you haven’t blended enough. Take an extra minute with a clean brush to diffuse the edges completely.”
Contouring for Heart-Shaped Faces
Heart-shaped faces are wider at the forehead and temples, narrowing to a pointed chin. Your goal is balancing the width difference between your forehead and chin.
- Apply contour along the sides of your forehead near your hairline to reduce width
- Blend contour on the very tip of your chin to make it appear less pointed
- Apply light contour under your cheekbones, but keep it minimal
- Avoid contouring your jawline, which is already narrow
Highlight the center of your forehead, under your eyes in an inverted triangle, and the center of your chin (not the tip). This brings forward the narrower parts of your face while the contour reduces the wider areas.
Pay special attention to blending at your temples. Harsh lines here look obvious because this area catches light naturally. Use a fluffy brush to blend upward into your hairline.
Don’t contour your cheeks too heavily. Your cheekbones are likely already prominent. Heavy contour can make the width difference between your forehead and chin more noticeable rather than less.
Contouring for Long or Rectangular Faces
Long faces need horizontal dimension rather than vertical. You’re creating the illusion of width to balance out length.
- Apply contour along your hairline across your forehead
- Blend contour under your chin and along your jawline
- Skip contouring under your cheekbones or keep it very minimal
- Focus on horizontal placement rather than vertical lines
Highlight the center of your forehead, the tops of your cheekbones, and your chin. Keep these highlights wider rather than tall. Blend them side to side instead of up and down.
This technique shortens the appearance of your face by darkening the top and bottom while bringing forward the middle section. The horizontal application prevents adding more length.
Avoid placing contour down the sides of your nose. This creates a vertical line that emphasizes length. If you want to contour your nose, keep it to the very tip only.
Many people with long faces try the same cheek contouring they see in tutorials. This actually elongates the face more. Focus on the top and bottom instead.
Common Contouring Mistakes and How to Fix Them
| Mistake | Why It Happens | The Fix |
|---|---|---|
| Muddy or orange contour | Wrong undertone or too warm | Choose cool-toned gray-brown shades |
| Visible lines | Not enough blending | Spend twice as long blending as applying |
| Contour disappears | Too light or poor pigmentation | Go two shades darker than you think |
| Dirty appearance | Applying over powder instead of cream base | Contour before setting powder |
| Uneven sides | Rushing or poor lighting | Work in natural light, check both sides frequently |
| Too dramatic for daytime | Following evening makeup tutorials | Use half the product for daily wear |
The most common issue is insufficient blending. Your contour should fade seamlessly into your foundation. If you see a line where it starts or stops, keep blending.
Another frequent problem is choosing the wrong shade. Test contour on your jawline in natural light before buying. It should look like a natural shadow, not brown or orange.
Placement errors happen when you follow generic tutorials instead of working with your specific face shape. What works for a round face creates problems on a square face. Always adapt techniques to your features.
Blending Techniques That Make or Break Your Look
Blending separates amateur contouring from professional results. Even perfectly placed contour looks terrible with poor blending.
Start with a light hand. You can always add more product. Removing excess is harder and wastes product. Apply contour in small sections rather than all at once.
Use circular motions to blend cream products. This diffuses the edges while maintaining the placement. For powder, use sweeping motions that follow the direction you want the shadow to go.
A damp beauty sponge works wonders for blending cream contour. Bounce it over the edges where contour meets foundation. This creates a seamless transition without removing all your work.
Set your contour with a matching powder shade if you used cream products. This prevents it from moving throughout the day. Use a light hand with setting powder. Too much creates a cakey appearance.
Check your work in different lighting. What looks perfect in your bathroom mirror might show harsh lines in natural light. Walk to a window before you finish. Make adjustments based on what you see.
The correct order to apply your makeup products ensures each layer works with the next instead of fighting against it.
Adjusting Techniques for Different Occasions
Daily contouring should be subtle. Use less product than you think you need. Focus on just one or two areas rather than contouring everything.
For work or school, contour only under your cheekbones and along your hairline. Skip the nose, jawline, and chin unless you have specific concerns. This creates definition without looking overdone in office lighting.
Evening events allow more dramatic contouring. You can go darker with your contour shade and add more highlight. Stage lighting and photography wash out subtle contouring, so you need more contrast.
Photos require special consideration. What looks natural in person can disappear on camera. Add slightly more contour than usual but blend even more thoroughly. Flash photography emphasizes any harsh lines.
- Apply contour in natural light for daytime looks
- Use warmer lighting to check evening makeup
- Take a photo with flash to see how it translates on camera
- Adjust based on the specific lighting of your destination
Different seasons affect how contour appears too. Summer tans mean you need darker contour shades. Winter skin requires lighter products. Reassess your shade choices every few months.
Building Your Skills Over Time
Nobody masters contouring overnight. Your first attempts will probably look too heavy or too light. That’s completely normal.
Practice on days when you’re staying home. Try different placements and products without the pressure of going out. Take photos to track your progress and see what works.
Start with just one area. Master cheek contouring before adding forehead, nose, and jawline work. Building skills gradually prevents overwhelm and helps you identify what makes the biggest difference for your face.
Watch your application in natural light. Artificial bathroom lighting hides mistakes that become obvious outdoors. Set up near a window or take a hand mirror outside.
Study your face in photos from different angles. Notice where natural shadows fall. Your contour should mimic and enhance these shadows, not create them in random places.
Join online communities focused on makeup learning. Seeing other beginners’ progress and mistakes helps you improve faster. Don’t compare yourself to professional makeup artists with years of experience.
Consider how makeup routines should change every decade as your face naturally shifts over time.
Choosing Between Cream and Powder Formulas
Cream contour works better for dry or mature skin. It blends seamlessly and creates a natural finish. Apply it after foundation but before powder.
Powder contour suits oily skin types. It sets quickly and lasts longer in humid conditions. Apply it after you’ve set your foundation with powder.
Beginners often find cream easier to blend and more forgiving. You have more working time before it sets. Mistakes are easier to fix.
Powder requires more skill but offers more precision. Once you master the technique, powder contour can look incredibly natural. It also works better for subtle, everyday looks.
You can use both in one look. Apply cream contour for major shaping, then set it with powder contour in a similar shade. This creates dimension that lasts all day without looking heavy.
Stick formulas offer portability and ease of use. They’re perfect for travel or touching up throughout the day. The downside is less shade variety compared to palettes.
Your Face Shape Is Your Best Guide
Learning to contour for your specific face shape transforms your makeup routine. You stop following generic tutorials that don’t work for your features. You start working with your natural bone structure instead of against it.
Remember that face shapes aren’t rigid categories. You might have a round face with a slightly square jaw. Or an oval face with heart-shaped tendencies. Adapt these techniques to your unique features rather than forcing yourself into one category.
The goal is always enhancement, not transformation. Contouring should make you look like yourself with better lighting, not like a different person. If your friends ask if you’re wearing makeup, you’ve probably gone too heavy. If they say you look rested and glowing, you’ve nailed it.
Practice makes progress. Your tenth attempt will look better than your first. Your fiftieth will look better than your tenth. Give yourself permission to learn and make mistakes along the way.
Start today with just one technique from this guide. Master that before adding more. Build your skills gradually and enjoy the process of learning what works for your unique, beautiful face.